Lab 16 Implementing a VPN

A VPN is a Virtual Private Network.

Its a way of allowing a remote user to access a network over an untrusted public connection, i.e. the internet. An employee can work from home or any other location and still access their data and app from the network.

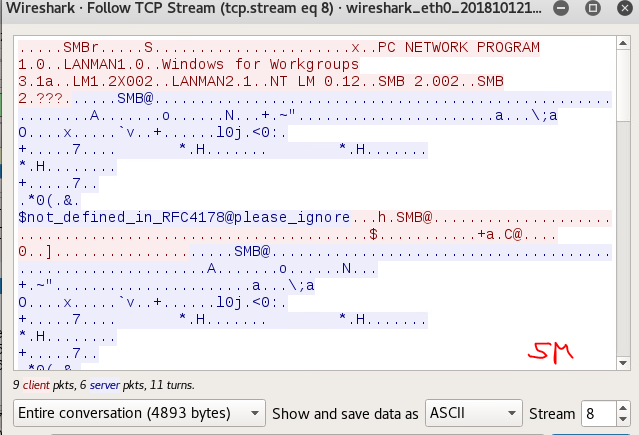
The importance of the VPN is to provide a secure connection, such that the data cannot be intercepted or modified. So the VPN must provide for encryption.

We also need a secure encrypted authentication method to allow authorised users to get in.

1 – Configure a RADIUS Server and Client

Remote Authentication Dial-In User Service (RADIUS) is an authentication and access protocol developed to allow centralised access to a network. A simple example would be a user entering a network via a router, the router acts as a RADIUS server and will authenticate with the AD.

In Server2016 the equivalent is a Network Policy Server.

The pfSense firewall will also function as a router and a RADIUS server.

secret.PNG

I realised here that copy and paste will not work on the VM, so I choose a shorter memorable manual shared secret, not best-practice but at least I will not need to type the auto generated secret shown above and no doubt have numerous typos.

The network policy wizard the sets the policies for VPN access, here we can configure settings such as time of day access.

firewall.PNG

The firewall is now a RADIUS server, note my smaller manual shared secret.

2 – Configuring the VPN concentrator

IKEv2 – refers to Internet Key Exchange

VPN concentrator is a router that allows multiple secure connections into a network.

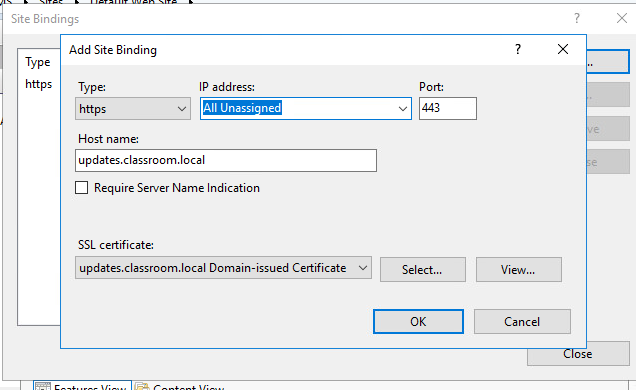
First a Certificate Authority on the firewall.

CA

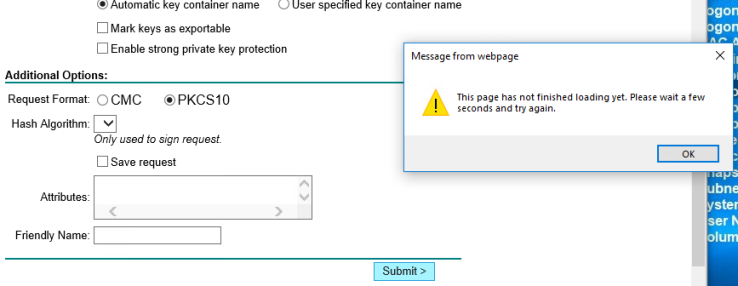
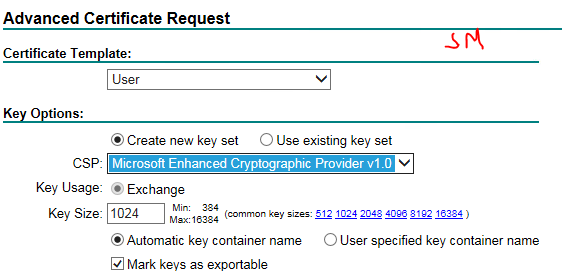
And next created a certificate.

IPSEC tunnels was set firstly to share a key and secondly to negotiate the encryption protocols to be used by the connection, the data through the “tunnel” will be encrypted and the client machine needs to know which encryption to use.

3- The Client Configuration

In this exercise a GPO is used to configure the clients, this can then be applied to all the computers in the domain, no need to individually set the clients.

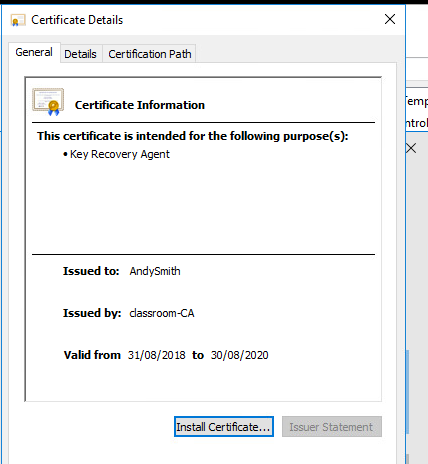
First we trust the certificate we issued from pfSense.

Then we set a GPO for network options which connects via our firewall ip address and requires an authentication protocol for security.

Before configuring the options for the clients IPv4 connection properties, I had to do a gpupdate /force on the Win10 machine, it hadn’t received the GPO which created the Classroom VPN adapter.

vpn connection

4 – Connecting to the VPN

It will be interesting to see if this works!

failed

2 hours of work later, and no luck. I am going to have to redo the lab and check my configurations!

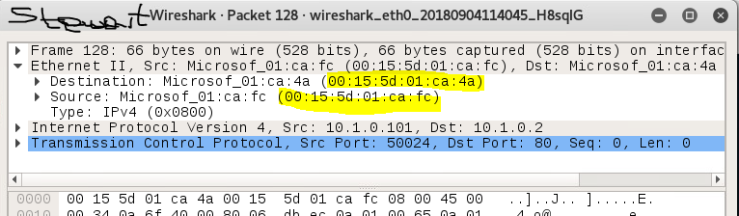
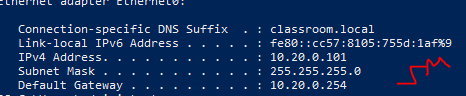
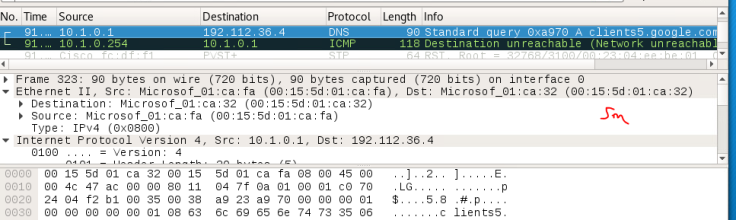
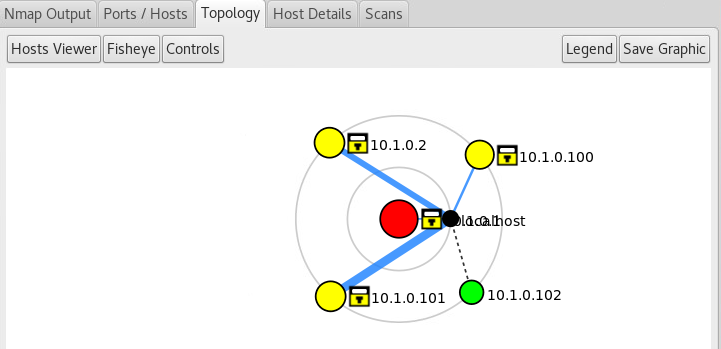
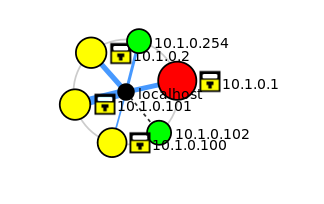
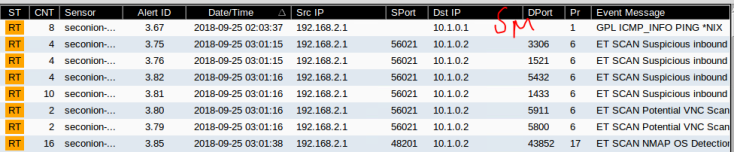
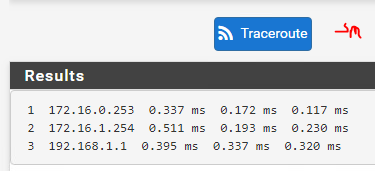
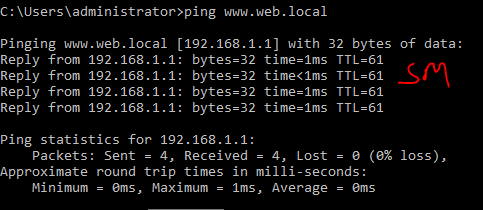
But first, can I ping the 10.1.0.0 network, I created a firewall rule to allow ICMP requests through the firewall, and one ping storm later and I can ping all the way from the 192.168.0.0 network to the DC, so the connection to the network is functional.

Update: I had a conversation with a colleague in my class, he’s a bright guy and we have kept up with each others progress through the Labs, so we are likely the only 2 working on this Lab. He has exactly the same problem and same error as me. This is highly suggestive of a problem with the Lab rather than a PEBKAC (problem exists between chair and keyboard).

We’ll keep an eye on the forum for the course and see if anyone fixes this bug.

Update 09/10 ex 2: I had my tutor look at my Lab and have discovered an error in the ex 2 where a tab in the firewall wasn’t available to set a rule to allow IPSec requests through the firewall, after re-doing the Lab this option is now available, so lets see if this is a fix.

IPSec tab

firewallrule

The firewall should now allow IPSec requests through.

So I redid all the Lab and also used the fixes suggested by colleagues, but I am unable to authenticate a user in the Pfsense, despite applying all the fixes as suggested by them. So still no connection through the VPN.

So one fix sorted but still not connecting.

An extreme exercise in patience and managing frustration, despite multiple attempts at this Lab and following all the fixes supplied by colleagues, I still can’t get a VPN connection on the network.

Critical Thinking

These Labs were an interesting learning experience, they offer a great look into the world of Network security and allowed us to experience many tools that are available both to protect and monitor networks.

Interestingly, the same tools are used by the very people we are protecting our network from. We can use the same tools to either attack or defend a network.

The most valuable experience came from the actual doing of the Labs, we used a different virtual environment (VSphere VMs) from the environment the Lab was built to run on (VMWare) and this through in many technical challenges to get the Labs to work.

Some were smooth and painless, but others especially Lab 12 was a massive challenge to set up the initial network just to get a “ping” request to travel across from one network to another.

The majority of the class have benefited from the tutors input here, a select few of us completed this Lab by building the network and ironing out the bugs which we have posted in forum posts to benefit the others. The tutor also fixed a lot of the settings to make the Lab setup a lot simpler. No worries, I learnt a huge amount from this Lab in particular about my abilities to problem solve an issue.

A second issue I have learned is about testing. These Labs were designed and written by people and not surprisingly there are errors in the Lab, some are just simple typos in the document. But I think for the price we paid for this course that the sellers of the e-book should have tested the course in a real virtual environment, this could have avoided a lot of the simple errors we had to problem solve. Reminder to myself, test everything, ideally by someone not involved in the design and build of a system.

Since we bought the e-textbook for this course, things have changed and the price of the textbook has doubled. Feedback from our tutor who has not used this version of the course before, suggests that the next version of this course will drop these Labs as just too expensive now for the average student.


Lab 14 Secure Network Addressing

1 – Setting up a pharming site

Pharming is the redirection of traffic to a website to a fake site, exploiting a DNS server so that a websites URL is redirected to a different IP address belonging to the attacker.

We setup a pharming site on the Kali VM that looks like the landing page for our classroom website, except it contains a link to an executable file supposedly for installing the 7-zip app.

fakesite

realsite

This is the real page, no downloads available

2 -Setting up the pharming attack

using DNSCHEF, a DNS proxy tool which is able to redirect DNS to a different IP address. Any request for the site updates.classroom.local will be redirected to this Kali VM (the fake site) instead of to the networks server hosting the Real site.

dnschef

We will also be using Metasploit which is a penetration tool designed to find, exploit and test a system for vulnerabilities.

configured

Metasploit is configured to give out IP addresses and become the DNS.

3 – Running the Pharming attack

To simulate this attack we have to first delete all the DCs IP address leases and then use a tool DHCPig.py to take all the available IPs from the real DHCP server, this means that devices connecting to the network will now have to use the Kali VM fake DHCP to get IP addresses as well DNS server and host server addresses –they get a real IP address but the fake DNS and web server addresses.

dhcpexhaust

Now to start the DHCP server role on the Kali machine and renew the IP on a client. The Win10 machine now has an IP (.201) from the rogue DHCP server and will get DNS info from the Kali machine. (10.1.0.192)

rogueDHCP

And now the Win10 machine will use Kali as a web server and get the “poisoned” fake website with a link to an executable, which I doubt is a real 7-zip, more definitely it will be some malware.

The machines on the network are unsuccessfully trying to use DNSchef to get their normal services.

dnschef2

4 – Configure DNSSEC

DNSSEC is a protocol for preventing a DNS attack like pharming, it uses digital signatures to provide trust between the DNS servers and resolver and clients.

We trust the signature and so know we are at the correct IP address for the URL name.

Using the DNSSEC wizard sets up signature records for our domain.

signaturerecords

Next step is to use a GPO so that all domain joined computers will use DNSSEC.

Validation through DNSSEC is now required for the domain and a signed record points to the true website server (10.1.0.2)

validation

Now to restart the Kali DHCP service,etc and the Win10 machine now again has an IP address from Kali.

kalidhcp

And the ‘Rogue” page cannot load because there is no digital signature and DNSSEC recognized on the “rogue” DNS server.

blocked

So using DNSSEC and digital signature technology we have protected our domain and ensure that all clients only get DNS resolution from a trusted, signed server and not from a rogue DNS server who attaches to our network and attempts to give rogue fake, pharmed websites.

5 – Configuring Switch Security

This exercise requires configurations on the switch which we can’t change in our Lab configuration. The switch settings would block the DHCP rogue server and prevent the issuing of IP Addresses from a rogue DHCP server on the network. DHCP Guard on the switch contacts the AD of the DC and gets a list of Authorized DHCP servers and blocks any replies from an unauthorized server.

Update 11/10/2018: To emulate the switch configuration changes for this exercise, I swapped the VMs to a switch which was set to:

Promiscuous mode: reject
MAC address changes: reject
Forged transmits: reject

Then used pig.py again to take up all the IP Address leases in the DC and started up the rogue DHCP server.

Interesting result, despite using a switch which is supposedly set to block rogue DHCP servers, after releasing and renewing the IP address on both the WIN7 and WIN10 VMs, they still received a .200 and .201 IP from the Kali Rogue DHCP. I suspect these switches we are using are not blocking DHCP, as would happen if we were to able to enable DHCP Guard on the switch as per the Lab.

DHCP Guard

And it failed to block the pharming attack, sending me to the fake site.

fake

Critical thinking

First introduction to a Pharming attack with a malicious user serving up a Fake website to get info from us or try to get us to do something like download a piece of malware disguised as a well known app.

The moral of this story, downloading any executable, even from a recognized site can potentially be harmful.

Nice exercise to have a relatively straight forward lab. The interesting aspect of this Lab is that to implement a pharming attack requires a hacker to have a physical connection within the network, a rogue machine connected to the network which is configured to hand out IP addresses as a DHCP server.

In everyday life, on joining a network a device sends out a broadcast on the network asking for anyone to supply an IP address and it will respond to the first reply it receives, it doesn’t confirm that the server is a real and trusted DHCP server, so a rogue machine can give out IP addresses as well as a fake DNS server address.

We  discussed in class that we could potentially detect a rogue DHCP server by a small device continually requesting IP addresses and comparing a received IP with those that tour DHCP server has in its scope, any address outside the scope would be from a rogue machine which we would then have to track down.

I also learnt that DNSSEC is becoming more prevalent and should be the gold standard for domains to validate themselves with a digital signature, but another expense to consider when creating a network and a new domain.

Another side effect of using a different virtual setup for the Lab, I couldn’t configure a switch to block the DHCP and Pharming attacks.


Lab 13 Using an Intrusion Detection System

Lucky number 13 strikes again.

This Lab uses Security Onion, a linux virtual machine which is used for Network monitoring and security. It enables us to connect to our network and monitor the traffic on the network.

This allows us to set sensors and monitor events on the network.

Unfortunately the Lab doesn’t work in our current configuration.

  • the ISP switch is not promiscuous, so we can’t see the traffic through the ports of the switch.
  • the login details supplied for SGUIL are incorrect, so we can’t launch the monitoring tool required fro the lab.

Watch this space, I have contacted our tutor.

I now have the corrected login details, our lab is set up a little differently from the description in the textbook, and I will experiment with the promiscuous switch we already have and reconfigure the network slightly to use this. It doesn’t look as if the Kali VM needs a promiscuous switch for this Lab to work.

1 -Configuring the Sensor

First step I did was to swap the switches around so the promiscuous switch is now on the 172.16.0.0 network and the Seconion VM is also connected to that switch.

Slightly different from the Lab instructions, SGUIL (a network security monitoring tool) has no seconion-eth0 interface listed to listen on. IFCONFIG in the terminal showed a docker0 interface to the 172.17.0.0 network and a ens160 to the 10.20.0.0 network.

So I experimented and selected the 2 interfaces individually to compare the results.

The ens160 interface captured the packets sent from the Kali VM, and gave similar results as the Lab with a SID of 2100366.

Capture

And monitoring the second interface didn’t capture anything.

Navigating around SGUIL is not as easy and intuitive as many Apps are, right clicking and holding down the button is an unusual method of showing menus.

But here’s a list of the “ping” packets captured crossing the networks switch.correlated events.PNG

And obviously SECONION is monitoring the switch so a ping from the router into its own network doesn’t go via another networks switch, so no captures with the last part of the exercise.

no capture

2 – Tuning the rule-set

SGUIL can be configured to automatically manage events we no longer want to inspect manually, auto-categorize, remove the rule, and add thresholds and triggers to a rule.

We manually modify a configuration file to disable an alert based on its SID as noted above.

Another typo in the Lab, ruleupdate doesn’t work but rule-update does.

rule update

rule

But something doesn’t work here and the conf file doesn’t update the rules and the pings are still being monitored. Tried searching and eventually found a new command to try,

sudo pulledpork.pl -c /etc/nsm/pulledpork/disablesid.conf

No luck, that threw a can’t find the file error.

And the last part 6 of this exercise to use Firefox on the Kali machine will never connect to updates.classroom.local because there is no DNS server on that network.

So this Lab ain’t working as expected in the Lab, another good problem solving exercise.

update 10/10: I have re-run the exercise and now the rules have updated and now the Seconion VM does not log the ping requests across the switch.

noalerts

3 – Examining Intrusion Incidents

Zenmap launched a NMAP scan against the Win-MS ans was able to pick up a lot of information about the server, but SQUIL did its job and identified the NMAP scan and the fact that lots of ports on the server were being scanned.

NMAP

SQUIL didn’t specifically detect a DoS attack from the Kali VM, but has picked up and blocked requests from some “bad” IP addresses which have been added to a rule list in Spamhaus don’t route. Considering Kali sent over 2 million requests from random IPs, not that many were blocked.

DoS

Critical Thinking

Once again we had to problem solve a few issues with this Lab, and in one case I still didn’t achieve the same results as the Lab and could.t find a fix. Maybe someone else will figure the rule not updating in ex 2.

But realistically getting the exact same result doesn’t effect the basic outcome of the exercise which was to learn how a rule can be disabled in the SQUIL app on a Seconion VM the end result is the same, I have learnt about a new tool for monitoring a network, a tool which I could now use in a future situation where I am responsible for monitoring a real live network.


Lab 12 Implementing a firewall

1 pfSense WebConfigurator Application

First issue with this Lab was making all the correct connections to match the network topology, I had to change the network adapters on most of the VMs to match the topology.

Second issue was the inability of the WIN10-WS to connect to the firewall on 10.1.0.254, turns out the IP address on the LAN and WAN interfaces does not match, but an easy fix using the console window in the pfSense to select option 2 and configure the interface addresses with little difficulty.

gateway

Next problem to solve: mtr (My traceroute tool) doesn’t appear in the menus, but a similar function is called Traceroute which will do the same job. But Traceroute is unable to locate the http://www.web.local on the LAMP16 VM @ 192.168.1.1.

LAMP16 is not currently on the INT02 switch (192.1.168.1.0 network), fixed that but ifconfig shows an address of  10.25.1.166??? So restarted the LAMP VM and now it says “start job running for raise network interfaces (5min..). Seems I’ve broken the config file for the network interfaces of the LAMP machine. The IPv4 address has vanished. Back to my search engine to try and find a fix.

interfaceConf

So its trying to get an IP from a DHCP server, which doesn’t exist on the 192.168.1.0 network, I’ll try set a static IP. Learning how to edit files with a command line in Ubuntu  is interesting.

staticIP

New ifconfig and IP address.

ifconfig

Still can’t trace a route to the http://www.web.local.

broke

Time to ping my way around, can’t ping the INT or ISP routers on the addresses in the diagram, guess we need to set up the interfaces on these routers as well. All set to DHCP currently.

Routers interfaces IP address all changed as per topology, and next step we need to set static routes on the routers

Rt-INT: set protocols static route 0.0.0.0/0 next-hop 172.16.1.254 distance ‘1’ —this tells the router any other network goes via Rt-ISP eth1 port

Rt-ISP: set protocols static route 10.1.0.0/24 next-hop 172.16.0.254 distance ‘1’  —where to go to find 10.1.0.0 network

and: set protocols static route 192.168.1.0/24 next-hop 172.16.1.254 distance ‘1’

last: set protocols static route 192.168.2.0/24 next-hop 172.16.1.254 distance ‘1’

Lastly to get out of the Lamp VM I configured a default gateway using the sudo vi to edit the config file again.

Finally I am able to ping the LAMP VM and perform a tracert from the WIN-10 machine

tracePing

in the pfSense dashboard, mtr has changed to “Traceroute”

I wasn’t able to traceroute with the web address, only with the IP address, the DNS is  not resolving somewhere.

trace

Figured the DNS resolution, on the 2016 DC, in the DNS manager http://www.web.local is in the conditional forwarders but is not resolving to the IP address. I deleted this record from conditional forwarding and added a new zone to forward lookup zone called web.local and created a new record in this zone called www, I can now ping and tracert with the name http://www.web.local.

weblocal

Traceroute in the pfSense dashboard now also resolves the name and gives the same result as using the IP address.

Otherwise this Lab is just an interesting overview of the firewall. This shows some of the connections the firewall is monitoring.

firewall

2 Configure Firewall rules

A new firewall rule, any web service requests from outside are redirected to the metasploitable web server at 10.1.0.10

rule

metasploit

So the Lab doesn’t tell us that the Kali machine should be on switch INT3, the 192.168.2.0 network  with an ip of 192.168.2.1 and will need a new static IP address and gateway set up. Or that the metasploitable VM should be on the LAN switch (10.1.0.0) and needs a static IP of 10.1.0.10. More linux this time using sudo nano to edit the configuration of the metasploitable LAN interface which was set to DHCP before.

So now i am able to ping from the metasploitable VM to the Kali VM, and from the Kali M to the 172.16.0.253 router but no further as the firewall blocks ICMP (ping ) requests. I set a rule to allow ping requests through the firewall but no luck in pinging the firewall or any VMs behind it.

But the NAT rule as set up per exercise 2 is not allowing traffic through as expected. I  have made a rule to allow ICMP requests through but this also doesn’t work. The only way I can access the network from outside is by disabling the firewall which just converts pfSense to a dumb router. Not what the exercise requires though.

blocked.PNG

Finally, figured out the block, there is a default rule in pfSense that blocks all private networks, 10.0.0.0/8 and 172.16.0.0/12 and 192.168.0.0/16 networks, so the traffic from the 192.168.2.1 network in the Lab is automatically blocked by default, unchecked the Block Private networks and works perfectly.

metasploitable

Metasploitable VM is now accessible through NAT at the firewall, the firewall redirects any requests for 192.168.0.254 to 10.1.0.10 (the Metas.VM).

Next step is to configure another firewall rule to block all traffic from the 192.168.2.0 network. Or we could just check the Block Private networks box again!

Blocked with a firewall rule.

rules

blocked

3 – Testing with Network Scans

Currently this exercise is unavailable in our Lab setup. We need Suricata on the firewall but the package isn’t installed and we are unable to install anything ourselves with no internet connection within our Lab. A quick email to the tutor, maybe he can fix this for us.

I now have a pfSense firewall with the Suricata package up and running. A colleague supplied a fix by creating a pfSense VM on his local machine and then uploading a template to Vsphere, seems we can upload to our own Vsphere datastore.

Suricata

Into the Kali machine and now use nmap to send pings to scan ports of the firewall, but ICMP requests are blocked by default so no result at first.

nmap1.PNG

Tried again with the -Pn switch enabled and Nmap was able to scan more but Suricata and the firewall are doing their job and not much information was retrieved.

nmap2

Suricata alerted to the scan and blocked the machine that originated the scan.

Alertsblocked2

After disabling the block mode, I re-ran Nmap, the results were he same, the same Nmap results, the same Suricata alerts but no blocked host.

Nikto is a web server scanner looking for vulnerabilities, co-incidentally it is also a humanoid race in Star Wars.

Ran this against the 172.16.0.254 (firewall) and found no web servers, but Suricata also didn’t generate any alerts?


4 – Testing with DoS tools

The Low Orbit Ion Cannon, a DoS tool must have been developed by a Star Wars fan.

LOIC

This Lab also uses Suricata for some monitoring but I’ll do as much as possible in the current absence of Suricata.

Using LOIC we flood the network with thousands of TCP packets and with enough resources we could overwhelm the firewall which would then stop servicing any legitimate requests, the server would stop responding to legitimate requests and our  service to the public and customers would stop – Denial of Service (DoS), even better we would use a botnet to send requests from multiple computers Distributed Dos (DDos).

flooding

I don’t think LOIC is working as the traffic compared to the normal after stopping the LOIC was unchanged and Suricata is not logging any alerts? So I changed the attack method to UDP, now its hitting hard, but no alerts logged from Suricata.

LOIC1

And a massive attack using hping3, an active network smashing tool, we are flooding the firewall on port 80 with 1000 SYN packets as fast as possible, hping was designed as a security tool to test networks, but can be used for a DoS attack.

hping

Much better result, Massive Dos attack flooding the bandwidth, the site crashed…..

brokenbydos

and the states table monitoring the sessions created by each SYN request is full.

states

crash report
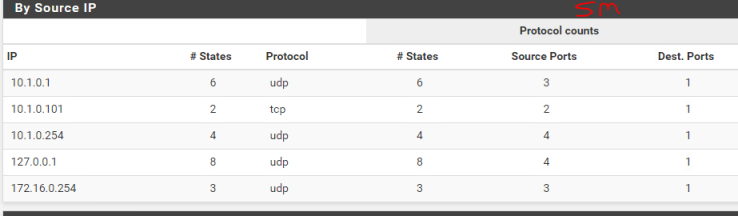
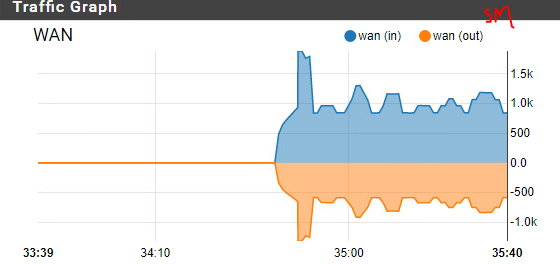
Interesting exercise, a firewall is designed in such a way as to detect DoS attacks, unfortunately this little hping3 masquerades as coming from random sources and the firewall does realize its being attacked.


Critical thinking

This was one of the ultimate problem solving labs, our VM setup was completely different from the Labs.

To get exercise one to work requires new skills,

  • setting up vyos routers port ip address
  • static routing
  • changing setting in pfSense console (no GUI/dashboard was available until IPs were changed)
  • editing a configuration file in a Linux VM
  • deleting and adding a DNS record to the Server

All of this just to get a machine on 1 network to access another machine on a different network through a firewall, so about 4 hours work with my search engine and adjusting settings for the first part of  a 45 min lab.

I also found out that the firewall automatically blocks some networks, the Lab didn’t mention that little fact, and caused a little frustration and more time consumed with problem solving.

Great exercise in problem solving a Network setup to get the Lab to work and a great and interesting introduction to denial of service attacks. Imagine a big online business like Amazon unable to serve legitimate customers because their firewalls and servers are overwhelmed by fake requests. A great way for a business to loose customers and reputation.

Lab 11 Implementing a secure network design

Using VLANs and Subnets to segment the network.

1 a Secure Authenticated Application

This will involve our Mail server VM and require user authentication via a certificate on the server and Transport Layer Security (TLS – the new “SSL” protocol).

This requires us to issue ourselves a domain certificate and bind it to our website.

cert bind

I see here its still called a SSL certificate even though we now use TLS.

Next step was to create a URL rewrite rule, if our server gets a http request, this rule changes the request to a https, so no insecure http sites can be accessed from our server.

2 Using MitM ARP spoofing

A new tool to use on the Kali VM. Ettercap

ettercap

Interesting trivia, an Ettercap is a D&D monster, a man-spider with an interesting property,
“Web Sense: While in contact with a web, the ettercap knows the exact location of any other creature in contact with the same web.”

In network security: “Ettercap is a comprehensive suite for man in the middle attacks. It features sniffing of live connections, content filtering on the fly and many other interesting tricks. It supports active and passive dissection of many protocols and includes many features for network and host analysis.”

In this exercise, ettercap is ARP poisoning, essentially ARP requests to the target computer changes the source MAC address of a packet to the hackers MAC address, so all packets are sent to the hacker who can read them and then forward to the correct destination.

arp poison

All the devices on the network have been given the Kali VMs MAC address 01:ca:4a, so the router will send all the packets traveling on the network to the Kali VM, where they can be captured and sent back to the router for forwarding to the intended destination.

TCP Packet

This is the intercepted packet from :FC (win10 VM) to the Mail Server

TCP retransmission

Packet is then re-transmitted from Kali VM to router (:32)

retransmission

and re-transmitted to intended destination, the MS (:fb).

3 Using SSLstrip

ARP spoofing, telling VMs that the MAC address of another VM is the MAC address of the Kali VM.

ARP spoofing

.2 (WIN2016-MS) now thinks the .101 (WIN10-WS) has the Kali VMs MAC address.

ARP spoofing2

.101 now thinks .2 has the Kali VMs MAC address, so all traffic between .101  and .2 will be sent to the Kali VM and be intercepted and read.

I then used wireshark and intercepted a http packet, and because the authentication is set to basic, the user and password credentials are in plain text.

PlainText

4 Segmenting the Network

More work arounds to get this lab to work, our switches are already on VLANs, so I have connected the servers to the 3186 VLAN and WS’s and Kali to the 3187 VLAN and the switches are connected by a router.

Checked the MAC addresses for the interfaces on the router:

  • Eth0 = 00:15:5d:01:aa:32 (VLAN10 in the Lab, my 3186VLAN)
  • Eth1 = 00:15:5d:01:aa:33 (VLAN20 in the Lab, my 3187VLAN)

Ran the updated command to clear the router, load /opt/vyatta/etc/config.boot.default and obtained a different result as the lab. All interfaces have vanished, so no MAC addresses to compare.

(The command to clear the router given in the lab does not work)

configdefault

Just a few configurations to set up on the router and then into the DHCP server to set a new address scope for the new subnet 10.20.0.0

Setting the new scope using 10.20.0.100-110 and the client VLAN is getting the IP addresses from the DHCP server on the server VLAN.

The WIN7 VM

win7

The WIN10 VM

10

The machines can also ping each other across the VLANs and the router so all connected correctly.

So I now have a network segmented into 2 parts using 2 Virtual LANs and connected using a router and IP addressing to connect the networks, the router also contains a firewall so we can potentially block/allow specific traffic through the router.

5 Sniffing the Default Gateway

First I had to move all the client machines onto the promiscuous switch (Int3) again to use Wireshark.

Used Ettercap and Wireshark to poison the network and capture the packets.

The WIN2016-DC\LABFILES viewed from WIN10.

shares

And the SMB packets were captured

SMB.PNG

Critical Thinking

The screenshots in this Lab now contain my initials, the tutor has now asked us to watermark our images in some way, that way it becomes more difficult to “share” the screenshots of our labs. These screenshots are used as “Proof of Work”, so not a bad idea, easy enough for someone to go to this blog online and download my screenshots and use them in their own blog as “Proof of their work” without having to actually do the work.

Lots of images are available online and its so easy to download someone elses work and adapt it and present it as your own. So a watermark becomes a security feature to protect your intellectual property.

The Lab was an interesting experiment in ARP poisoning and spoofing and how it can affect a network. Although called implementing a secure network, half the lab was about ARP poisoning.

But HTTP redirecting to HTTPs was new to me and the use of  VLANs and a router/firewall is a great network segmentation tool.


Lab 10 Using Account Management Tools

1 Observing Service Accounts

Here we used a tool called “Process Explorer”, a more advanced version of the standard windows Task Manager, it enables us to see more information about the apps/processes running on a device.

Using this tool we can identify exactly what is running on our machine and potentially see any unwanted apps or malware.

Processes

I tried the app on my own machine, interesting to see how many processes run on a machine at any time. I also used this site to check the functions of some I didn’t recognise. http://www.processlibrary.com/en/

Fortunately no strange malware running!

2 Browsing Default AD Groups and Users

Interesting exploration of the builtin users and security groups in windows server AD.

DefaultGroups

3 Securing the Administrative Accounts

Admin

We learn best practice is to “hide” the default Administrator account by changing the name and the description of the Administrator users account. We also created a dummy “Administrator” user with no privileges.

HideAdmin

Getting rid of the default “Guest” account is also a good idea.

We also learned how to give a non-admin user some more permissions on the network by delegating controls to a user, so creating a type of “super-user” with some limited admin functions.

4 Investigating Group Policy

Changed a few security settings through GPO’s, we enabled an auditing policy which will log users who attempt to access objects in the system which have access control lists, so we have a list of users who try (successfully or not) to access specific parts of our network.

We also added the admins to a new user security group and changed their password settings to ensure that admins have a more secure password than an ordinary user.

password

5 Configuring Users and Groups

Attempted to login to the WIN2016-MS and add Sam, as an administrator of the machine, not possible as Sam has no admin privileges on the machine.

Denied

He also wasn’t able to access admin functions in the computer management console or access the same function on the DC, his permissions are limited to adding users and OUs.

He was able to add and change users and groups in the AD on the Domain Controller.

Sam was also able to create nested user groups to allow different permissions to either view or change files that will be shared by an admin.

6 Configuring a file share

Here we created a new folder on the WIN2016-MS VM, and then used the share function to change the permissions on the file, anyone in the “change” group can access and modify the file, but those in the “read” group have limited access and can only read the file – this restricts only authorised users permissions to change the file. The file is more secure than if any user can modify it.

permissions

Setting up an audit on the share keeps a log of who did what and when to the share. And effective access allows us to check the permissions against an individual user.

Critical Thought

Process Explore was a great little exercise in expanding the functionality of the humble task manager. I was especially interested to download and run it on my bare-metal machine and see what was running, who the manufacturer of the process was and what access privileges it was using.

Fortunately no weird malware running, all the processes turned out to be legit.

The rest of the lab introduced us to different levels of securing the network using various methods, I particularly enjoyed hiding the administrator account and creating a fake administrator. Now I have to remember to log in with “Andy”.

I would hazard a guess that some networks out in the wild have an administrator account named “Andy”.

Lab 8 Certificates and Key Recovery

1 Configuring a Key Recovery Agent

Another bug in the Lab, the Lab doesn’t work using Edge on the Win10 VM, we have to open the certificate request with Internet Explorer.

Even IE explorer is struggling to load the page correctly, maybe we need something like Chrome to download the page properly from the server.

BrokenPage

I’ll ask the tutor for a Chrome install file to be uploaded to our datastore and see if that works……..

Tried using Chrome, but same result with the webpage. But a colleague has made it work using a different client machine, the WIN7 VM so lets try that. Now its working and the page loads correctly, on with the Lab.

Working

The certificate was applied for and has been issued.IssuedCert.PNG

And installed on the client machine.

The certificate is then configured to be used as a key recovery agent.

configured

2 Deploying User Certificates

Here we have created a certificate template for our all domain users which will allow the private key to be archived and can be used for encrypting their data on their drive.

cert template

Then we created a Group Policy Object which will automatically enroll all users with a user certificate.

3 Using the Encrypting File System (EFS)

Sam is going to encrypt some data with a symmetric key, and then use a Public-Private key pair to encrypt the symmetric key.

Added some files to Sam’s C drive and encrypted them using his certificate.

cert thumb2

The certificate thumbprints can be seen above.

The Lab said the next step was to open MMC (Microsoft Management System) but this isn’t available on the Win edition we have, easy work around, search “Certificate” and the Certificate Manager is already installed and allows me to view the certificates.

certif

The matching thumbprint.

thumbprint

Then Sam went ahead and exported his Private Key and deleted it along with his certificate, he’s screwed, his data is encrypted and he’s lost his Private Key and the certificate, now he can’t decrypt his data again.

secret

All encrypted and without the key and certificate Sam can’t access his secret documents, interesting that we can still see the thumbnail of the image and the image is visible for a fraction of a second when opened, then blurs, not perfect encryption.

I repeated this exercise using windows7 VM to try and get ex 4 working and the encrypted image is visible as a thumbnail but cannot be opened, again not perfect encryption. The documents names are green as they are encrypted.

encrypted


4 Performing Key Recovery

Sam’s data is encrypted and he’s lost his key.

And neither he nor an admin can chane the files/folders properties to remove the encryption attribute.

Now to recover his data. The certificate has a matching thumbprint to the one that was on Sam’s VM.

matched tp

And the serial number.

SN

Now this works, but first I had to add the folder c:\LABFILES\samblob using file explorer.

certutil

And now I can import the recovered certificate to the certificates console on the client machine and Sam can now see his encrypted files again.

decrypt

Initially, I couldn’t get this section of the Lab to work as shown below. The SN in the following image differs as I have re-worked the Lab.

certutil fail

“Could be an error in typing the serial number, but this was triple checked, as copy and paste doesn’t work in the Vsphere VMs. Checked again, definitely the same number.”

Turns out there was yet another typo in the Lab instructions, they left out the file name in the certutil command.

“Certutil.exe is a command-line program that is installed as part of Certificate Services. You can use Certutil.exe to dump and display certification authority (CA) configuration information, configure Certificate Services, backup and restore CA components, and verify certificates, key pairs, and certificate chains.”

So certutil allows us to get the encrypted blob containing the certificate and the key, decrypt it with the recovery key and then we can import it back to Sam and he will now have the original certificate and key and can open his files again.

Critical Thinking

Using vSphere, which is not the same virtual environment as the Lab was designed to run in keeps us on our toes as we attempt to trouble shoot issues that crop up with elements of the Lab not working as anticipated.

Sometimes we can find fixes, but not everything is successful, Still a good exercise in troubleshooting and often we learn more by troubleshooting than just following a Lab.

Interesting that encrypting an image with this method still leaves a clear image thumbnail visible!

Update

Thanks to other members of the class.

Turns out the 1st section of the Lab works on the WIN7 VM, so I was able to issue the Key Recovery Agent certificate to this VM instead of the WIN10 VM.

pending_Cert

Key Rec Cert.PNG

Update 2 (27/09)

Today I did the Lab over using the fix to the typo found by a colleague and I can now view my encrypted Koala Bear.


Lab 7 Implementing public key infrastructure

1 Exploring the Certificate Server

Using certificates a server is able to prove who it is (identification) and also contains the public key and the algorithms used in the certificate and the digital signature. The root certificate (shown below) is used to issue and sign subsidiary certificates and then the root certificate server is taken offline to protect its private key.

certificate

2 Requesting and Revoking Certificates

Straight forward process for the mail-server to request a certificate from the CA server. (Certificate Authority)

MS certificate

This certificate is then attached (bound) to the secure port (https) of the website. I can now check and see the newly issued certificate on my CA server .

issued cert

Now we can open the updates.classroom.local website with https and the browser will verify the certificate and trust and display the page.

website

Next step was to revoke the certificate and then publish a list of revoked certificates (CRL). So even though the certificate has been revoked we can still access the secure website with no warning about certificates expired. The Lab shows us that the CRL has not been published, so the Win2016-MS still has a certificate and browsers won’t know its revoked until the CRL is published. My server is set to publish the CRL later today, so until then the certificate is still valid, could be a security vulnerability and risk here.

Critical thinking

A straight forward Lab today, always good when everything works as expected in the Lab.

This was a perfect Lab to do today, the class this morning was all about digital signatures and certificates, so a great way to cement the knowledge in my brain. In an ideal world we would have a class discussion and the a Lab on the subject the same day for that exact reason. I guess Lab5 not fully functional was a good thing for me after all.

An interesting little fact that a digital certificate can be revoked, but that information might not be published until the next day, so a browser checking for a revoked certificate would still trust the certificate until the CRL is published.

Lab 5 more Network Scanning Tools

1 – Configure the adapters

This we can’t do, we can’t change the switch settings on Vsphere.

update 22/08/2018: We now have a switch with promiscuous mode enabled, so a VM can see all the packets passing through the switch and not just its own packets. So all the VMs are now using this switch.

Changed the IPv4 settings on the Kali VM and confirmed that all the machines can ping each other.

2 – Using Wireshark

Wireshark, a packet sniffing app. Traffic across a network is in small containers called packets, which have headers with information on the packet and a payload, the data in the packet. Wireshark collects all these packets crossing the network and displays their contents. Unfortunately it does not decrypt the payload, so we can’t see encrypted data.

I have used Wireshark before in networking courses and am quite familiar with the interface and the results.

wireshark1

Despite following the lab instructions I wasn’t able to generate any smb traffic. But opening the app on my bare-metal machine allowed me to continue with that part of the lab.

Spoke to DuckDuckGo, it seems that the virtual environment we are using (vSphere) has a default that blocks the promiscuous mode on the virtual switch, so the VMs can only see packages that are destined for themselves, we can’t sniff any packages that are not for us. And the permissions on the servers don’t allow students to change these settings, time to message the tutor.

Update 22/08/2018: We have a promiscuous switch. So I can now see all the network traffic.

Promiscious

A captured DNS packet showing the Ethernet layer details and the payload.

dns frame

A SMB2 package showing the TCP protocol with sequence an ACK fields.

smb2

And following a TCP stream.

tcp stream

3 Examining Unsecured Traffic

Currently this doesn’t work as a result of the switch settings.

Update 22/08/2018: The lab is working now.

The shared secret visible in Win VM.

secretshare

The secret share captured by Kali.

secret

And a couple of plaintext passwords in the packet.

plaintext

another plaintext

Never send plaintext file over a network if the data is confidential, always encrypt the data so the packet contents can’t be intercepted and read and exploited.

4 Using Netcat

Same problem, with the switch unfortunately. We need a promiscuous switch for this Lab to work.

Update 22/08/2018:

NCAT is a command line app for sending and receiving data across a network, it won’t initially work as the port it listens on will be blocked by the firewalls.

This is the port NCAT is using.

ncatlisten.PNG

So I followed all the steps in the Lab, including sending a much larger file using NCAT with the port open, but no activity was detected on that port by NETSTAT and no packets with the file were captured by Wireshark.

No31337

The connection was forcibly closed to the WIN10 machine suggesting the file was transferred.

force close


Critical Thinking

Having used WireShark before for packet sniffing and examining a packets contents, this wasn’t the most useful Lab in the series, but it was interesting to see a plaintext file send unencrypted over the network.

The most interesting aspect was trouble shooting.

Why wasn’t the Lab working as suggested in the Textbook. A little research into VMWare and VSphere came up with the answer. VSphere switches are configured to start in a non-promiscuous mode. This means the switches only allow packets to the correct destination VMs, our Kali VM can’t see any other packets traveling on the network due to the switch settings. And a little more research showed that as a student I was unable to re-configure the switch, the Edit button is greyed out, so back to the tutor to try and apply a fix.

Update 22/08/2018: We now have a switch with promiscuous mode enabled which means Kali can see all the network packets .

So I will whip through the Lab again and see whats changed.

Next time I should probably delay blog entries until I know the Lab will be working, but on second thoughts, blogging things as they happen and then updating in the future will actually work better for me.


Lab 4 Network Scanning Tools

We are going to check out our security posture, how our network is set up to handle security.

1 – Scan the local subnet

The IP address of the Kali VM is 10.1.0.102, and I now have learned a few new commands for linux,

“ip a” shows the same information as ifconfig.

“arp -a’ and “ip neighbour’ show all the other VMs IP addresses connected to my virtual network.

“netdiscover” is also used to scan the network and see who is connected.

netdiscover

so 3 different methods of scanning the network and identifying connected VMs.

  1. arp /a
  2. ip neighbour
  3. netdiscover -i [] -r []

2 – Scan a host

nmap (Network Mapper) is a free linux app which can scan a network and collect information on the VMs on our network, we can tell which machines are connected and information such as applications running, the OS and the firewall. (nmap.org).

I typed in the command in the lab, but my output was different,

nmap result

works perfectly if i enter a known machines IPaddress. I can see which ports are open and which services are running, and the MAC address.

nmap -A 10.1.0.101 shows more information including the OS of the machine.

I have a suspicion that using the VM setup we have is not doing the same sort of things that the CompTIA Security Lab setup is doing.

3 – DNS harvesting

Using a tool called “dig” we were able to find the servers domain name.

dig result

after running a second command in dig we know now  the full DNS info of the machines on our network, the FQDN’s.

  1. win2016-dc.classroom.local
  2. win2016-ms.classroom.local
  3. win7-ws.classroom.local
  4. win10-ws.classroom.local

4 – Zenmap

The graphical interface for nmap.

An easier method of looking at the information from nmap and I guess easier to do the scan without knowing or typing the commands.

zenmap

Critical thinking

These actual labs seem to have small differences in the results when compared with the output expected in the textbook.

It seems like the VMs in the textbook are connected via a virtual router with an IP address of 10.1.0.254. My mistake, going back to the beginning of the lab it seems we need to have the rt-lan VM switched on and connected the to virtual switch to be a 5th device on the network. I presumed that this was the virtual switch connecting all the machines together. Looking at the config settings in the vyos router the IP address is 10.1.0.254. That explains the minor differences.

New results for zenmap:

zenmap2

Advice to self, read the labs properly and don’t make dumb mistakes.

So we now have a couple of tools that allow us to scan the network we are part of. These tools give us valuable information about the devices connected. Knowing what is connected allows us to determine what vulnerabilities exist in the network, which machines might have vulnerabilities that could be exploited.